Create an Open Zeppelin ERC20 in Scaffold-Eth With Great Ease


Haha, just kidding, I'm going to spam a list of resources here

While the stack used here is solid, the example itself is a more of a toy example and is not meant for production in and of itself. Projects that will be deployed onchain should be evaluated carefully and audited. If you'd like to know more about the importance of auditing contracts, you should see this excellent article by a colleague, Paula Petit.
Stack
We're going to use Open Zeppelin's contracts. They're secure, having been battle-tested by many respected names in the space. I'm using the basic ERC20 contract here. In a real use-case scenario, you should familiarize yourself with their additional ERC20 contracts. They have contracts that expose much more functionality.
We're also going to use [Austin Griffith](https://twitter.com/austingriffith)'s [Scaffold-Eth] (https://github.com/austintgriffith/scaffold-eth) framework. As he puts it, Scaffold gives you the ability to iterate in contract development.
Once you learn the ropes with it a bit, it is an amazing tool in development. It basically mashes together Hardhat (formerly Buidler, the scourge of autocorrect and search engines) and Create-Eth-App, but also adds in a number of amazingly cool tools, the list of which constantly gets larger. By now it ships with easy connections to IPFS and a subgraph. We'll just be scratching the surface on it here.
Installation
The only thing you need to install is Scaffold-Eth. On the command line, manoeuvre to the location you'd like to drop the Scaffold-Eth folder into, and:
git clone https://github.com/austintgriffith/scaffold-eth.git
Feel free to rename the folder to your project name, if so desired. When you're ready, cd into the directory and:

There is nothing else to install for the rest of this little tutorial. Everything you need is already here.
Let's fire up Scaffold now so we can get a feel for it, and also to use the hot reload feature for contracts. You'll need three different command-line consoles/tabs. I'll assume that you're going to use a local virtual chain (like Ganache or the JavaScript VM option in Remix) for development:

You'll see the Hardhat chain fire up. As it does, it will list 20 pre-funded accounts and their private keys. You may want to copy that to a text file if you plan on working on this project further. This console will constantly poll the dev chain. You'll see calls like eth_blockNumber and eth_getBalance, and also see output anytime you interact with the chain.
Next, let's get the frontend up:

This should automatically open a tab on your browser to localhost:3000, which is where the frontend runs. You should see something like this:
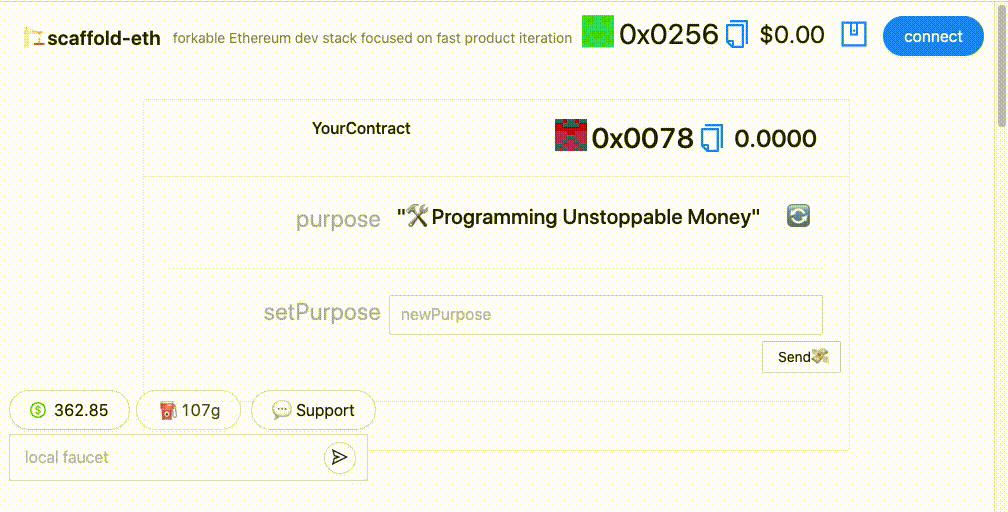
I'm not going to walk you through the frontend, as Austin already does this quite well in his videos (the supercharged fast one, or the long-form one for the EEA). The one thing I'll call your attention to is that you can see a component that renders text fields for the YourContract contract that Scaffold comes preloaded with. We'll get back to that. Last but not least, we need the third tab for our contracts:

This not only compiles and deploys your contracts, but also sets up hot reload, meaning it'll recompile and deploy anytime you save changes to a contract in the set location in the codebase.
Note: We'll talk about /packages/hardhat/contracts in more detail in the next paragraph. If you experience difficulties with watch for whatever reason, yarn compile will simply compile your contracts, and yarn deploy will compile, deploy, and exit (as opposed to watch, which keeps on running).
On to it!
It's time to open up your text editor of choice. You'll see a directory called packages. In it there is a package called hardhat now (buidler in older versions of Scaffold). In it there's a folder called contracts. This is where your contracts go. As of this writing, Scaffold ships with two files already in that folder: YourContract.sol and YourContract.args. We'll get to what the second is soon.
Create two new files in this location (/packages/hardhat/contracts) for your ERC20 - I'll call them Token.sol and Token.args here. Now you're going to need to copy-paste the OpenZeppelin ERC20 contract into that new file, and make a few changes.
You can either get the OZ ERC20, or inside your own project in: /packages/hardhat/node_modules/@openzeppelin/contracts/token/ERC20/ERC20.sol
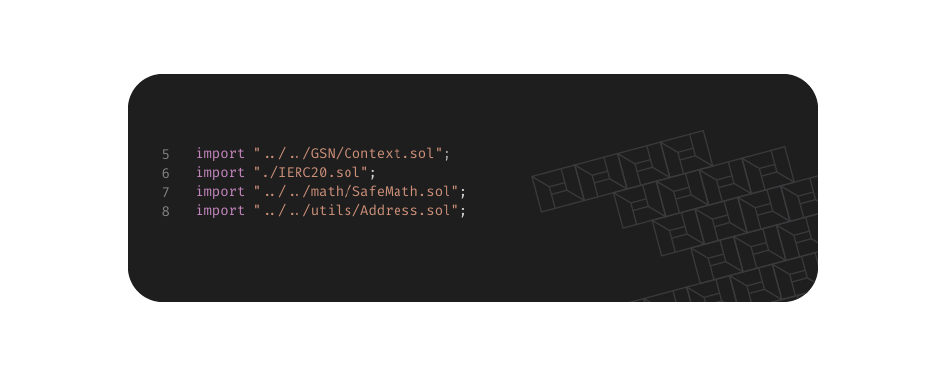
Like I mentioned before, we need to make a few changes. Here are what the imports look like by default:
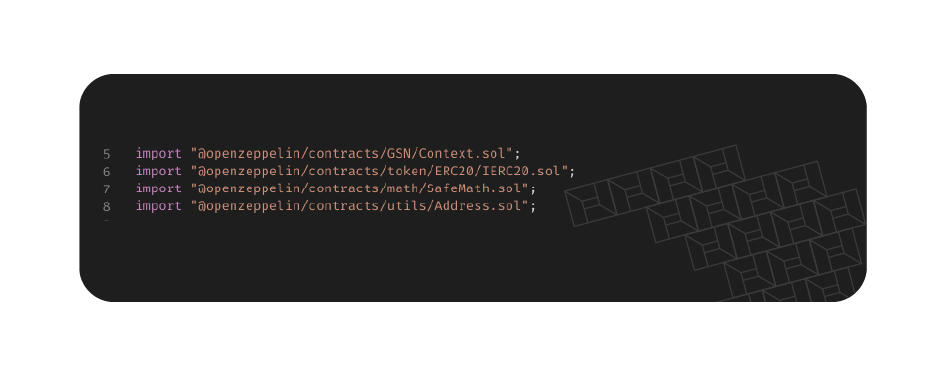
We'll need to point them to the contracts inside of node_modules. That's not too hard:
You should also rename the contract to Token (or whatever name you're using). Before you save, we should also fill in Token.args, along with explaining what it is. If you take a look at the ERC20 contract you're using, you'll see that the constructor takes two arguments: a string for the name, and a string for the ticker (like DAI or COMP). How are you going to input these on deploy? That's what the args file is for. It should be structured as so: ["Awesome", "AWE"]
Though you can name your token and ticker whatever you like. If you save both these files and are running yarn watch, it should automatically compile and deploy the new contract. Otherwise, you can use yarn deploy. The terminals/tabs showing you the dev chain and also the one you used yarn watch on should show you the details of the deployment, including the address of the deployed contract.
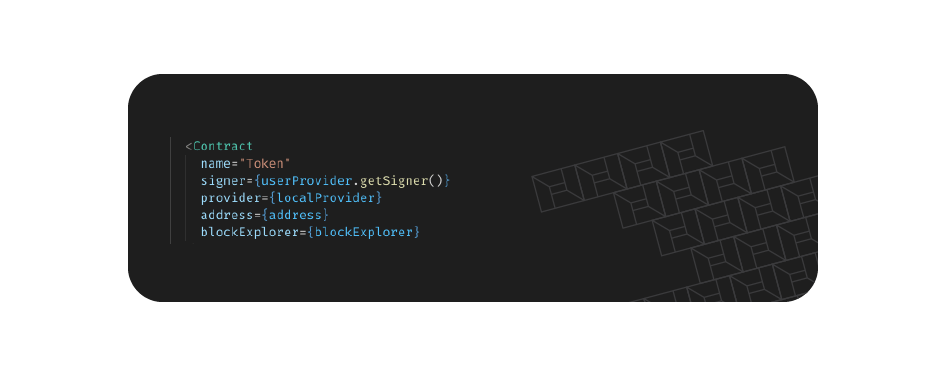
Now it's time to work on that frontend. Inside the code editor, navigate to /packages/react-app/src/App.jsx (this may change slightly over time, it used to be App.js, and it wouldn't shock me if Austin moved to TypeScript, which would make it App.tsx, but the general idea is the App component). You'll see a custom component he's created for reading contracts:
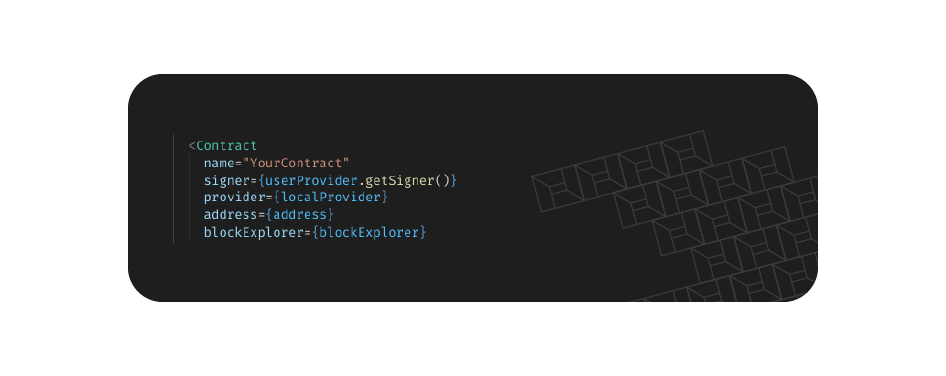
Copy it, and paste it immediately afterwards. All you need to do is change the name to the name of your contract - Token - and on save, you should have a new component which allows you to interact with your ERC20 contract:
And that's it! You have deployed an ERC20 contract to a local dev chain, and can interact with it via the frontend!
Conclusion
There's a lot more we could cover, like deploying to a testnet or mainnet, or some of the other cool and awesome features Austin has in Scaffold, but we're going to keep it simple (I hope) and short (sort of). If you're interested in more articles covering topics like these, or in a deeper dive into Scaffold-Eth, please let us know on Twitter (@LinumLabs)!

%20(1).jpg)

